Dell motherboard drivers
 If you wish to Perform a BIOS or CMOS Reset and/or Clear the NVRAM, this article can show you how
The information stored in the BIOS (Basic Input/Output System), known as ESCD (Extended System Configuration Data) can occasionally become corrupted due to a variety of situations such as power events, incorrect settings by the user, hardware incompatibility due to a specific setting, or a No POST or No Video scenario. In these cases it is sometimes necessary to reset the BIOS or CMOS (Complementary metal–oxide–semiconductor) to “Factory Defaults”, or in other circumstances, clear the NVRAM (Non-Volatile Random Access Memory)
CAUTION: Be careful when altering BIOS settings. The BIOS interface is designed for advanced users, you can change a setting that could prevent your computer from starting correctly and you could suffer a potential loss of data.
If the system is able to complete POST.
- Restart the system. Click on Start, Turn off Computer and Restart.
- At the Dell loading screen Tap F2 to enter the BIOS. "Entering Setup" will appear when the command has been recognised. Certain models may use a different key. The key will be displayed during the boot process. For most Dell laptops and desktops, the key is F2.
- Once loaded, depending on BIOS age and type, you can reset the defaults by either using F9 key to Load Defaults (Shown as an option at the bottom of the screen), the Alt + F key combination, or the Load Defaults button shown on the screen, to load the factory defaults.
- Press Esc on your keyboard and select Save and exit, or click the Exit button, again depending on the version you have.
- Choose the Enter key to save all changes and exit the BIOS screen. Allow your system to restart for the BIOS settings to reset.
NOTE: This is a different function from clearing the CMOS/NVRAM and only returns the system to its factory default settings, it does NOT clear the ESCD.
Clearing the NVRAM and ESCD Settings
When the ESCD contained in the NVRAM needs to be cleared, this can be accomplished by manipulating the RTCRST (Real Time Clock Reset) jumper on the system board. Once the jumpers are correctly set and power is supplied this will then reset the BIOS on the system.
RTCRST - Clears NVRAM. The NVRAM will be cleared when the jumper is closed (use the jumper from the password bridge (PSWD)). To properly clear; AC power must be applied (not necessarily turned on) to the system for about 10 seconds while the jumper is closed.
Pins 1-2 once shorted will clear NVRAM and reset all ESCD Settings
NOTE: You can use the RTCRST jumper procedure above to attempt recovery from a No POST, No Video situation.
Clearing CMOS Settings
The CMOS contains the current BIOS settings
- Turn off the computer and disconnect the power cable from the electrical outlet.
- Remove the computer cover.
- Locate the 2-pin password connector (PSWD) on the system board.
- Remove the 2-pin jumper plug.
- Locate the 2-pin CMOS jumper (RTCRST) on the system board.
- Move the 2-pin jumper plug from the password jumper to pins into the CMOS jumper.
- Plug in AC power to the system and wait ten seconds for the CMOS to clear.
- Move the 2-pin jumper plug back to the password jumper.
 Replace the computer cover.
- Connect your computer and devices to electrical outlets, and turn them on.
Location of the RTCRST Jumper will vary by platform and form factor. For more information about the jumper locations refer to the system service manuals located at
Figure 1: Typical location of jumpers on a desktop motherboard
| Jumper 1 | RTCRST Jumper (Resets the BIOS) | Jumper 2 | PSWD Jumper (Resets the BIOS Password) |
This is another method that can be used to reset the BIOS on the system by simply removing the CMOS coin cell battery and then clearing power from the system. This is commonly done if you cannot access the jumpers or if you are dealing with a laptop system.
NOTE: This is applicable to both Desktop and Portable systems. Portable systems however will require a door on the bottom or perhaps keyboard removal to access the coin cell battery. Refer to the system service manuals located at- Disconnect the system from external power source, remove main battery on a laptop.
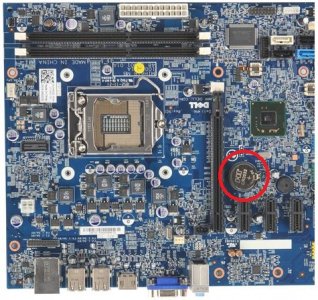
- Remove the computer cover and locate the CMOS coin cell battery (Figures 1 & 2)
- Remove or disconnect the coin cell battery
- Press the power button for at least 10 seconds to drain all residual power from the system
- Re-insert or re-connect the coin cell battery
- Assemble the unit and verify functionality
- When the system is powered on, it will warn that the date and time is not set, indicating a successful reset
Figure 2: Coin Cell Battery on a Desktop System (Next to the PCI-E Slots)
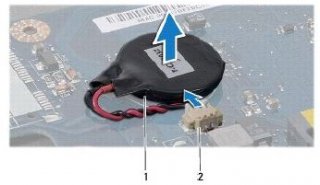
Figure 3: Coin Cell Battery on a Portable System
| Coin Cell Battery | Battery cable connector |
As well as the RTCRST Jumper, most Desktop systems have a Password Enable Jumper
PSWD - Password enable. The system password will be cleared and disabled when the system is started with this jumper removed. Shorting the jumper enables password.
NOTE: The password jumper plug must be reinstalled on the password jumper pins in order to enable the password feature
- Remove the 2-pin jumper plug and set the jumper plug aside.
- Replace the computer cover.
- Connect your keyboard and mouse, then connect your computer and monitor to electrical outlets and turn them on.
- After the operating system loads, turn the computer off.
- Disconnect the keyboard and mouse, then disconnect the computer and monitor from their electrical outlets.
- Press the power button on the computer to ground the system board.
- Replace the 2-pin jumper plug onto the password connector pins (PSWD) on the system board.
- Connect your computer and devices to electrical outlets, and then turn them on.

